This documentation page provides a comprehensive guide for managing your on-cloud data lab. Whether you need to grant access to other space members, connect folders, or update your bricks, this page offers step-by-step tutorials and spotlight videos to assist you. Additionally, it covers starting and stopping your data lab and configuring green computing options.
Lab management dashboard
From the Constellab dashboard, choose your on-cloud data lab and click on the button details to reach the data lab management dashboard.
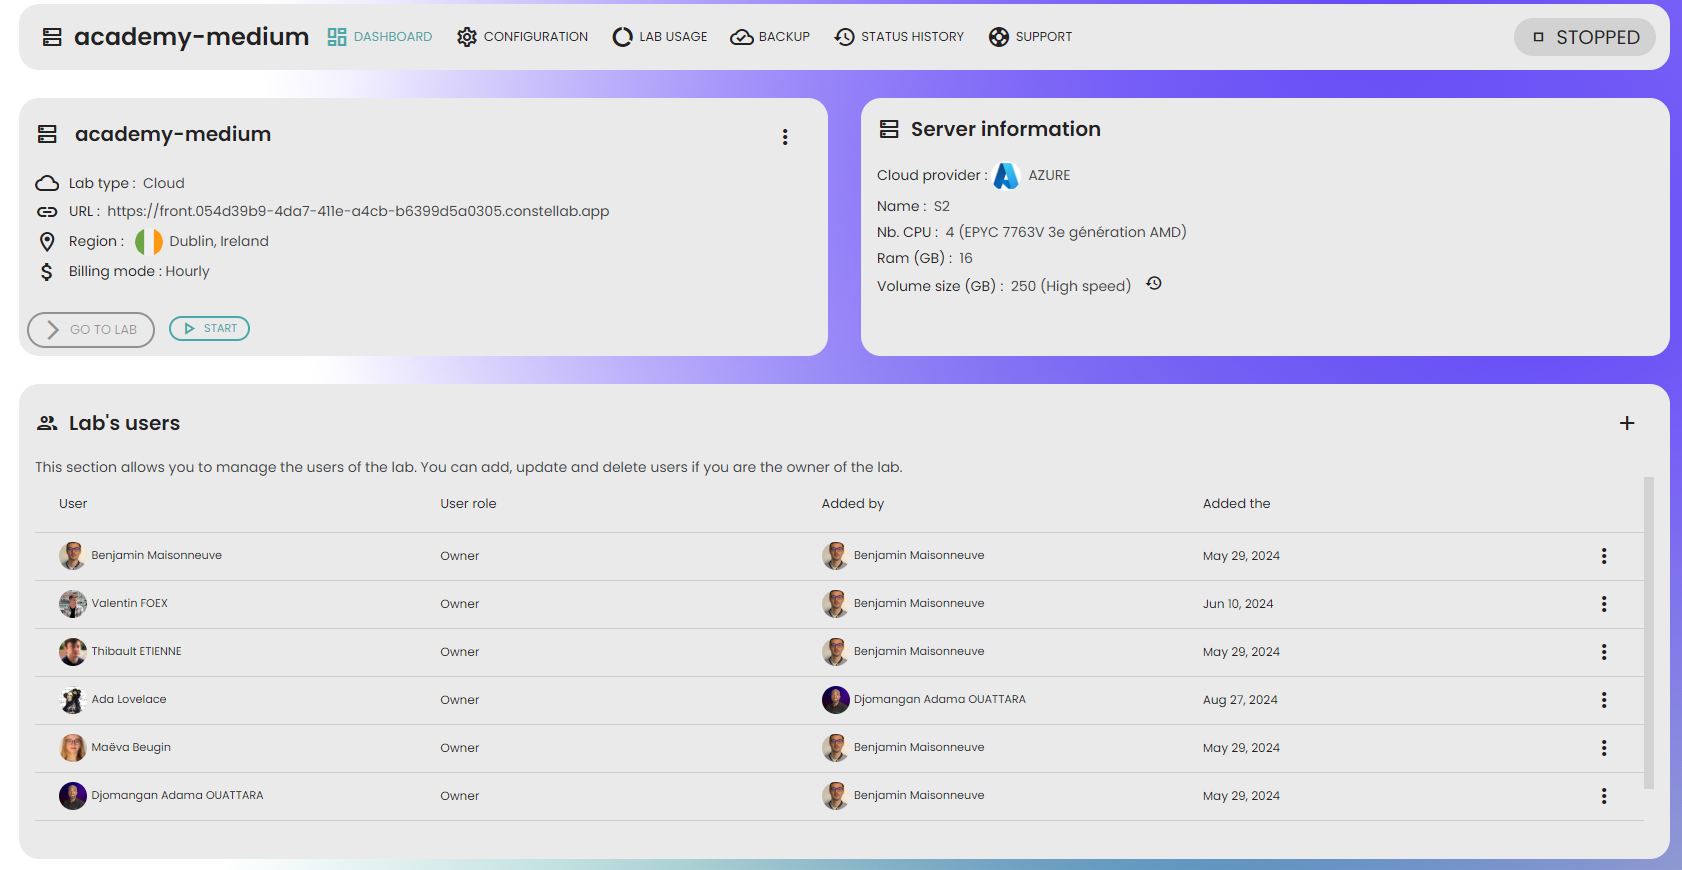
On the Dashboard (cf. image bellow), you can view various elements about your data lab, starting with data lab information with the name of your lab, the URL, the region, etc.. Additionally, you can access information about the server. It is also possible to handle the lab's users and connect your folder to this data lab.
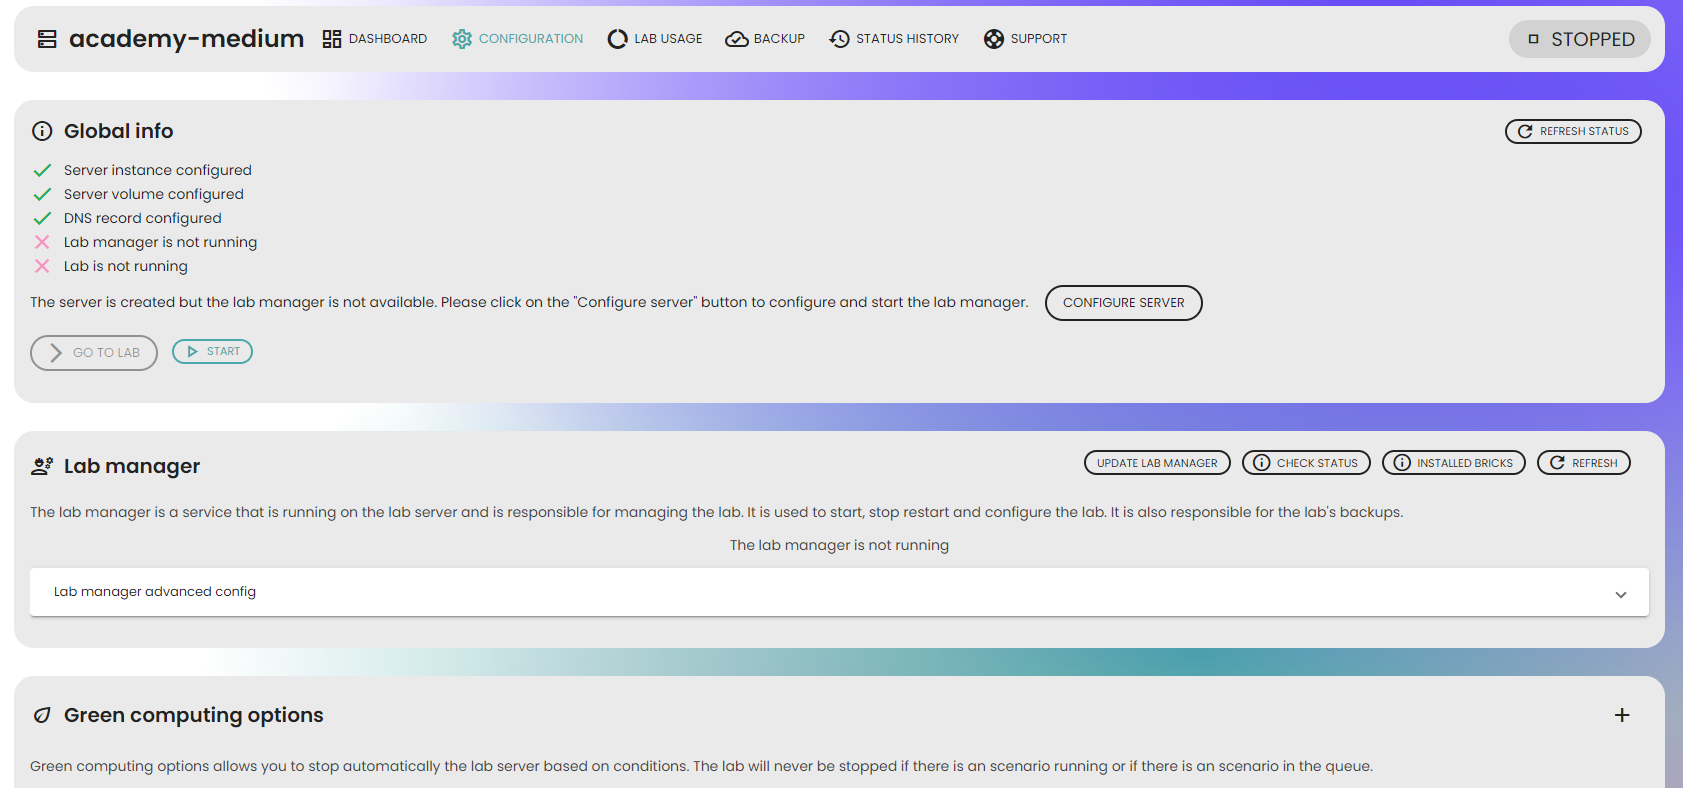
To configure your data lab, you need to access to the Configuration page(cf. image bellow). On the top of this page, you will find an overview of your data lab's status (running, stopped, in maintenance). You can start your data lab and stop the data lab server from this page. You can also update your lab bricks and configure green computing options.
How to manage users of your data lab?
 ▶
▶To add a new user or change a user's role in the lab, follow these steps:
- Go to the
Lab dashboard page.
- In the
Lab's users section, click on the + button located in the top-right corner.
- Choose a user from your space.
- Select the desired role for this user.
- Confirm your selection. The user will then have the ability to log in to the data lab.
- If you need to modify the status of a user, follow these steps:
Click on the menu button
⁝ next to the user you want to modify.
- From the menu options, you can modify the user's role or remove them from the lab.
How to connect folders to a data lab?
 ▶
▶To connect a folder to a data lab, follow these steps:
- Go to the
Lab dashboard page
- In the Lab's folder section, click on the
+ button located in the top-right corner.
- Choose a folder from the list of folders that you can access.
- Confirm your selection. The folder will now be available in the data lab, allowing you to attach scenarios and notes to it.
If you need to remove a folder from a lab, follow these steps:
- Click on the menu button
⁝ next to the folder you want to delete. - From the menu options, select the option to remove the folder from the lab. Please note that if there are scenarios or notes associated with the folder, it cannot be removed. The folder will still be available in your space.
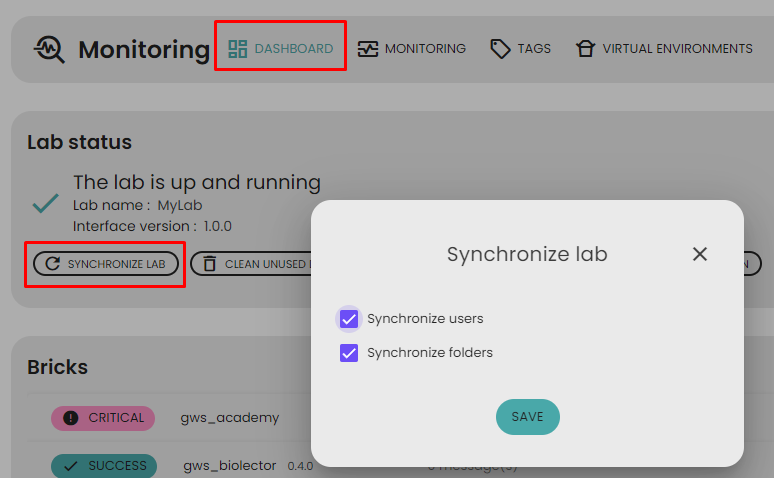
Forcing synchronization of data lab folders
When folders are modified in the space, it's possible that the data lab may not reflect the updates. To ensure synchronization between the space and the data lab, follow these steps:
- In the data lab, open the
monitoring dashboard page.
- Click on the
Synchronize lab option.
- Leave the
Synchronize folder checkbox selected.
- Validate the changes. This will force the synchronization of the lab folder, ensuring that it is up to date with any modifications made in the space.
Start and stop your on-cloud data lab
 ▶
▶You can access to your data lab directly from the Constellab dashboard. If the button Go to lab is grey, it means that your data lab is off. To start you lab, click on the button details to open the Lab dashboard page. You can check the status of your data lab on the top-right corner of this page.
To launch the data lab, click on the green button Start. The status of your data lab will change to Started. You should wait few seconds to a couple of minutes and when the status is Running, you lab is ready to use.
To stop the data lab, open the Lab dashboard page and click on the button Stop. This will stop the server and the data lab, and if your on-cloud lab is billed hourly, the billing will stop.
Restart your lab application
To restart (or start) you lab application when the lab server is up, open the Lab configuration page and under Lab manager section, click on Restart lab (or Initialize lab).

The data lab's status should refresh automatically. If it doesn't, you can use the Refresh status button at the top of the page to force a refresh.
Once your data lab is up and running, you can log in and navigate to the Monitoring page (go to Settings > Monitoring) to verify if all the bricks have been loaded correctly and if their versions are accurate.
Start lab server
If your data lab is marked as Stopped, it indicates that the server is not currently running. To get started, you will need to start the server first and then initiate the lab application to begin your work.
On the lab configuration page, locate the Server section and click on the Start option to start the server.
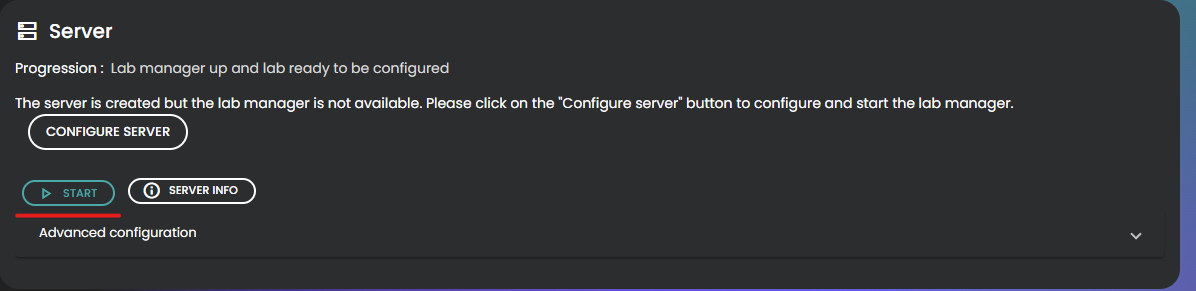
The data lab status will change to Server starting, indicating that the server is being initialized. Please wait for the server to be ready before starting the data lab application. The data lab status should refresh automatically, but if it doesn't, you can use the Refresh status option at the top of the page to force a refresh.
Once the server is ready, the status will change to Server started. This means that the server is up and running, but the lab application itself is not yet running. To start the lab application, go to the Lab Manager and click on Initialize Lab (refer to the Restart your lab application section for more detailed instructions).
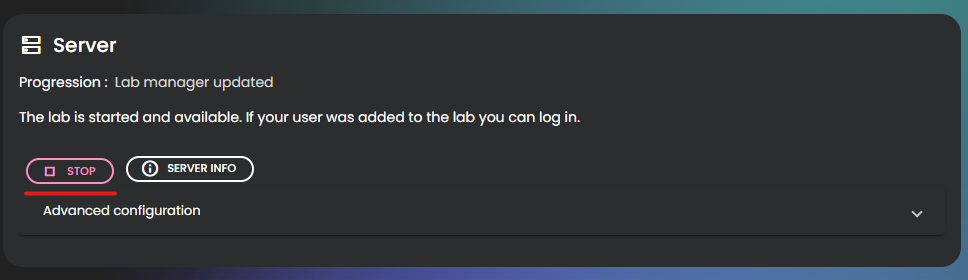
Stop lab server
To stop the data lab server, open the Lab configuration page, under Server section click on Stop. This will stop the server and if the data lab is billed hourly, the billing will stop.
Update your lab bricks
In the Lab manager > Lab config section you can update your data lab configuration:
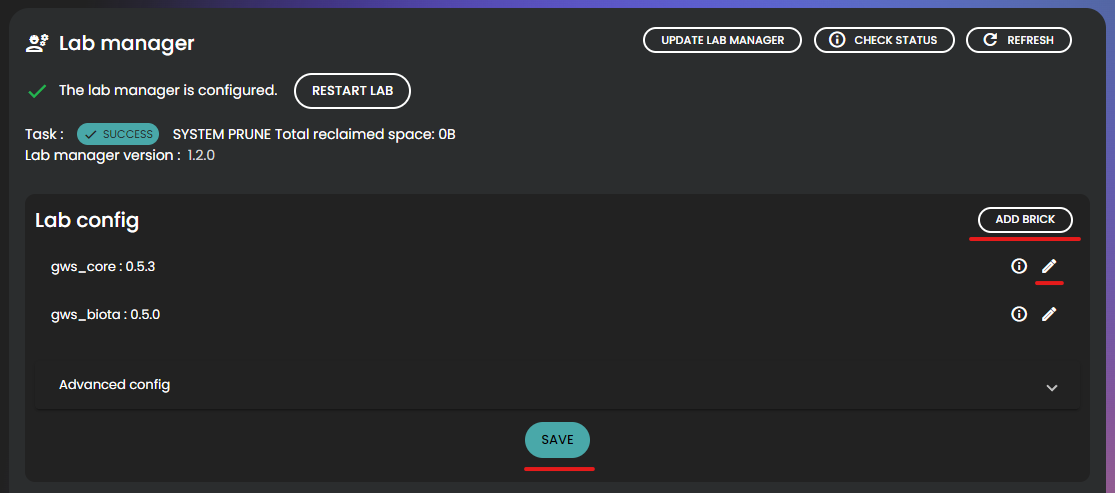
To add a new brick, simply click on the Add brick button. the select brick and version you want.
Alternatively, you can use the Edit button on a brick to modify its version. It is advisable to use a higher version and only revert to an older version when you are certain about the implications.
Once you have made the necessary changes, click on Save.
Afterward, you will need to restart your lab. Please refer to the Restart your lab application section for detailed instructions.
To verify the brick version of your lab, log in to your lab, click on the Settings button, and then navigate to the Monitoring page.
Update lab manager
It is possible you Lab manager is not up to date. If this is the case, you will have a warning in the Lab manager section :
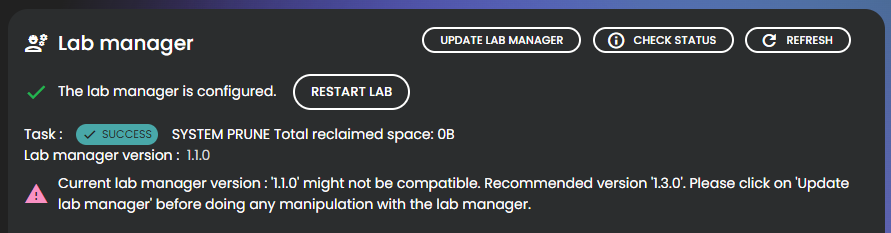
If you have this warning, you can update the Lab manager by clicking on Update lab manager button. Select the recommended version (here 1.3.0) and press Save. This will take a few minutes, and once the Lab manager has been updated, it is recommended to restart the lab application to apply the latest configurations. You can also update your lab bricks and then restart your lab.

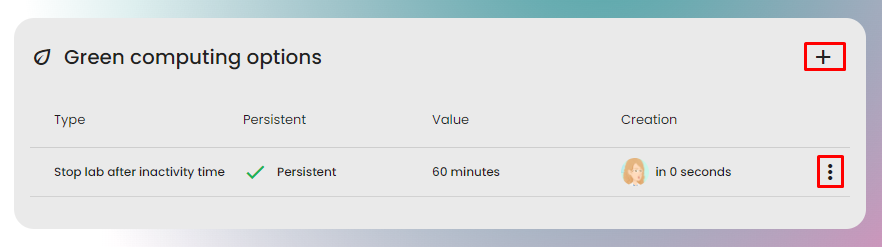
How to configure green computing options ?
Green computing options provide the ability to automatically stop your data lab, reducing costs and environmental impact on the data lab server. It is recommended to set up green computing options for labs managed on an hourly basis.
To configure green computing options, follow these steps:
- Open the
Lab configuration page
- In the Green computing options section, click on the
+ button located in the top-right corner.
- Select the desired type of option from the available choices:
- Stop the lab after scenario: The lab will be stopped once there are no running scenarios and no scenarios in the queue. This option can be useful when a long scenario is running, and it saves the results externally, such as in an S3 bucket.
- Stop lab after backup: The lab will be stopped once there are no running backups.
- Stop lab after a specific time: The lab will be stopped after a specific time based on your timezone.
- Stop lab after inactivity time: The lab will be stopped after a specific period of inactivity.
- Fill in the value based on the option you selected (optional).
- Select the persistence:
- Persistent: The option will remain active after its execution.
- Not persistent: The option will be deleted after its execution (executed only once).
- Save the option.
If you need to modify or delete an option, follow these steps:
- Click on the menu button
⁝ next to the option you want to modify.
- From the menu options, you can modify or delete the option as needed.
Connect two data labs
You can connect two data labs to easily share resources and scenarios between them. This is particularly useful for sending data from a compute lab to a datahub.
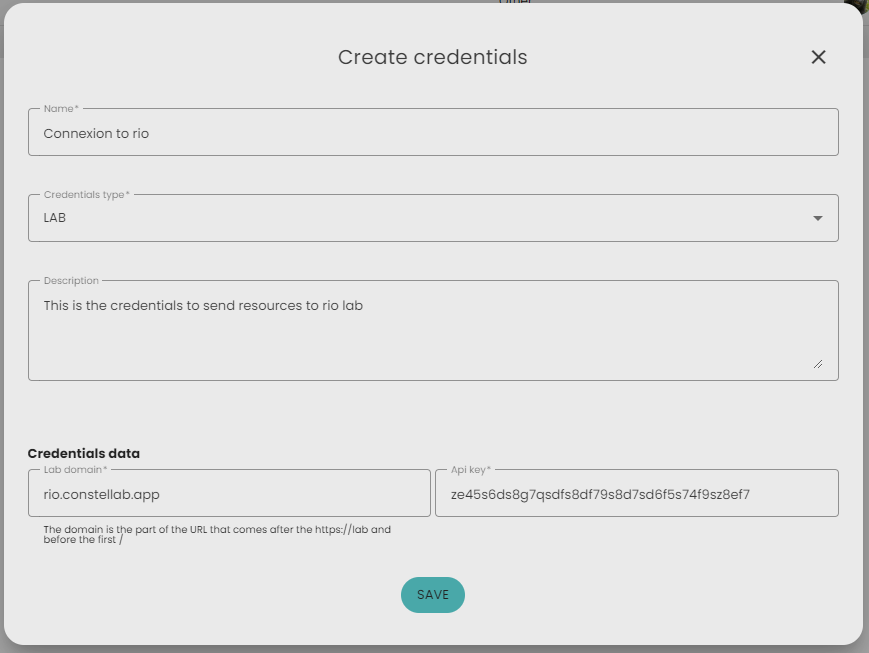
To connect two data labs, you need to create shared credentials in both labs.
In the source lab
- Go to
Settings > Monitoring > Credentials - Click on
Create credentials. - Set a clear name for the credentials and select
Type: LAB. - Enter the domain of the destination lab. For example, if the URL is
https://front.rio.constellab.app/app/monitoring/credentials, the domain is rio.constellab.app. - Generate an API key (minimum 20 characters, with a mix of letters and numbers).
- Copy the api key and click
Save.
In the Destination Lab
- Log in to the destination lab (e.g., the datahub).
- Create credentials that match the source lab:
- The name can be different, but the API key must match
- Enter the domain of the source lab.
