A resource refers to all data-oriented objects manipulated within a data lab. From each scenario, processes utilize resources as input and produce resources as output. Users can upload resources into the data lab or download them from external sources, such as another data lab.
Resources can encompass various types of objects, including data files, folders, tables, images, and more. Each resource contains different views, which are utilized to generate visualizations of the data. For example, a table can be viewed in a spreadsheet-like format or visualized as a scatter plot.
In this page, you can access to step-by-step tutorials and spotlight videos related to resource. For example, you can learn how to upload data, how to import a resource or how to share resources between data labs. We recommend reviewing the page about the data lab overview as a prerequisite to better understand the content here.
How to upload a file ?
In a data lab, you have the capability to upload any file. Once a file is uploaded, this file is transformed into a Resource of type File that can be used within scenarios.
To upload a file, please follow these steps:
- Open the
Resources page in your lab environment.
- Look for the
Upload files button and click on it.
- Select one or more files from your computer that you wish to upload.
- For each file, you may have the option to select the type of the file. In most cases, you can leave it as the default
File type. The File is a specific type of Resource that refers to a file. Setting a specific type can be helpful if you want to convert the uploaded file into a specific File type that is required in a scenario. You can change the type of file later.
- Click on the
Upload files button to start the upload process.
- You will see a progress indicator in a bottom right popup. While the upload is in progress, you can continue using the lab as usual.
- Once the upload is complete, the file should be available at the top of the list (you can also click on the success message in the popup to open the resource). You can check the size of the file to verify that the upload was successful.
Additionally, a Resource of type File can be imported and converted to another type of Resource , for example a Resource of type Table which is the main type of resource representing a table. To import a resource, please see the section How to import a resource ?

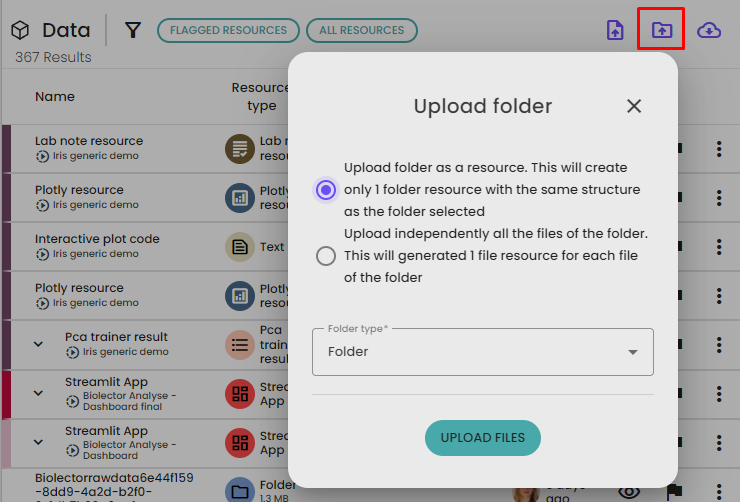
How to upload a folder ?
To upload a folder in the data lab, you have two options:
- Uploading each file of the folder individually: in this case, you will upload each file within the folder separately, treating them as individual resources. This method is similar to the file upload process.
- Uploading the folder as a
Folder resource: this option creates a single resource of type Folder. This can be useful when an process within a scenario requires a folder as an input.
To upload a folder follow these steps
- Open the
Resource page in your data lab
- Look for the Upload
Folder button and click on it.
- Select the folder you want to upload from your computer.
- Choose whether you want to import the files individually or upload the whole folder as a single resource.
- Select the appropriate type of object for the folder or files.
- Click on the
Upload files button to initiate the upload process.
- You can monitor the progress of the upload in a similar manner as the file upload process.
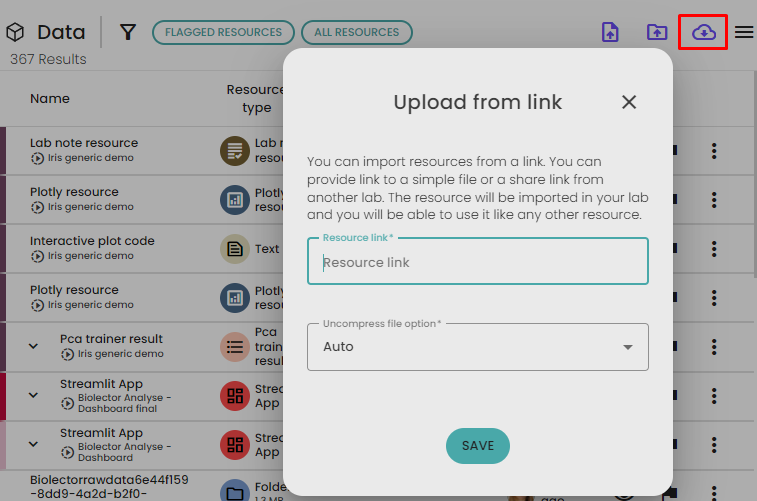
How to upload a resource from an external source?
From the Resources page you can also upload resources using an external link. This enables you to access files from a server and directly download them to your lab.
The link can be a public link to a file. It can also be a resource share link from another data lab, in this case the resource will be downloaded with the same type as the shared resource (see the section How to share a resource between labs ? for more information)
To upload a resource from an external source, please follow these steps:
- Open the
Resource detail page of your data lab.
- Click on the button
Upload from link .
- Paste the link of the file or the resource you want to upload into the provided field.
- Click on the "Save" button or a similar option to initiate the upload process.
- This will trigger the creation of a scenario in the background, specifically a
Downloader scenario.
- If your file is very large, you may have to wait a few seconds. To monitor the progress of the download, open the execution queue panel by navigating to
Settings and selecting Execution queue. Here, you should see the Downloader scenario with its progress displayed.
- Once the download is complete, the resource will be available from the Databox. You may also click on the success message in a bottom right popup to open the resource.
How to manage resources?
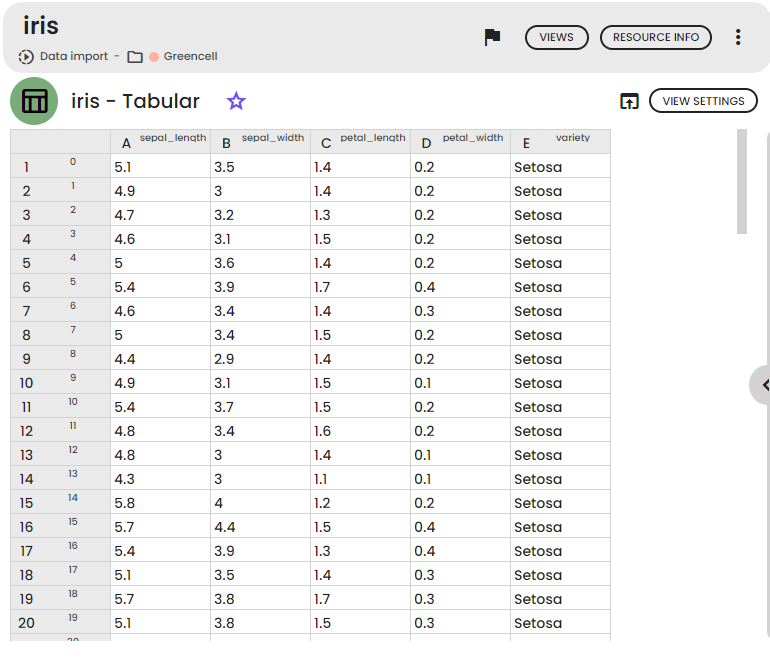
Through the Resources page, you gain access to all resources, sorted by their creation date (by default). Each resource has a name of the resource, a type (for example a type File), tags (optional), a creator and a creation date. Additionally, you will find three buttons: the first button, represented by an eye icon, opens a pop-up page displaying the resource's default view; the flag button allows you to mark a resource as important; and finally the menu button ⁝ provides access to a list of actions.

When you click on a resource, a resource page will open, displaying the resource along with a menu bar at the top and the default view. In this menu bar, you can view the name of the resource (e.g., iris.csv), which can also be modified directly by clicking on it, along with various buttons offering additional options.
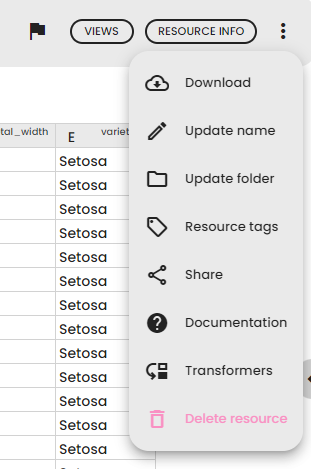
The list of actions from the menu button
You can manage the resource using the menu button ⁝ :
- Download: This allows you to export and download the resource as a file. Note that not all resources can be downloaded.
- Update name: You can update the name of the resource.
- Update folder: If the resource was uploaded, set the folder for the resource. If the resource was generated by a scenario, this will update the folder for the entire scenario and all the generated resources.
- Resource tags: Use this to view and change the tags of the resource. It helps in grouping and finding resources.
- Share: Generate a share link to share resource with another data lab.
- Documentation: This provides information about the resource type.
- Transformer: This option lets you modify the resource directly by calling a transformer. It will trigger a background scenario automatically.
- Delete resource: This button allows you to delete a resource. However, if the resource is an output of a scenario, this action will reset the scenario that generated the resource.
How to get information about a resource?
To view more information about the resource, follow these steps:
- Open the
Resource detail page.
- Click on
Resource info. This will open a dialog with 4 sections: - Resource info: This section displays global information about the resource, such as tags, the scenario that generates it, project, type, creation date, and more.
- History of views: In this section, you can see all the views previously generated for this resource. Simply click on a view to see it.
- Scenarios that use the resource: This section lists all the scenarios that use this resource as input. Click on a scenario to open it.
- Notes that use the resource: Here, you can find a list of notes that contain a view of this resource. Click on a note to open it.
What is a flagged resource?
A flagged resource is a resource that is easily available in the Resources pages. Flagged resources are marked as important and intended to be easily found.
By default, only the output resources of a scenario are flagged; intermediate resources of a scenario are not flagged. Uploaded resources are also flagged by default.
You have the flexibility to change the flag status of a resource at any time. Simply click on the flag button of the resource.
How to share resources between data labs?
Share from a share link
Sharing resources between data labs is easy, it allows one data lab to download a resource generated by another data lab. To do so, follow these steps:
- Open the
Resource detail page.
- Click on menu buton
⁝ then Share button.
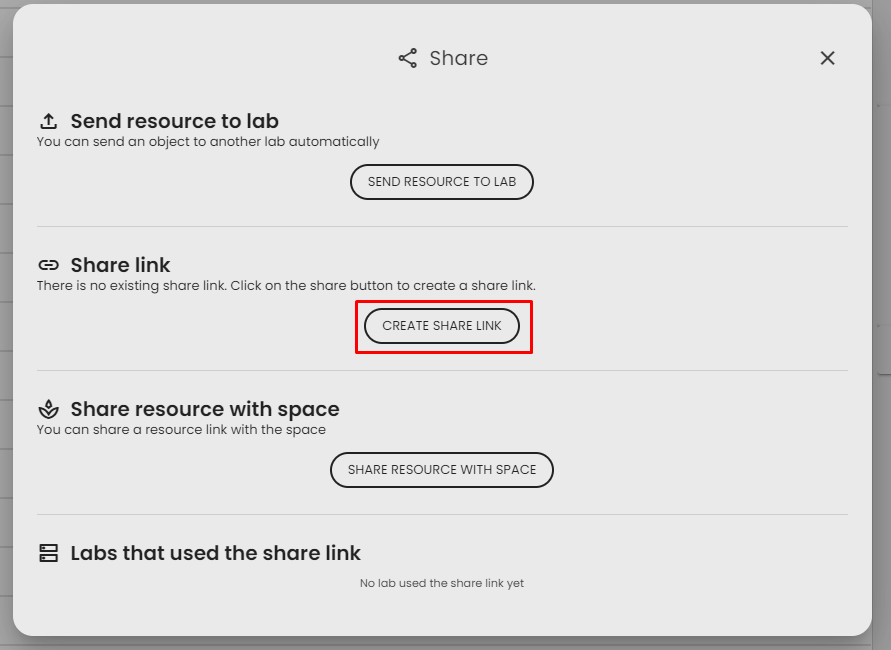
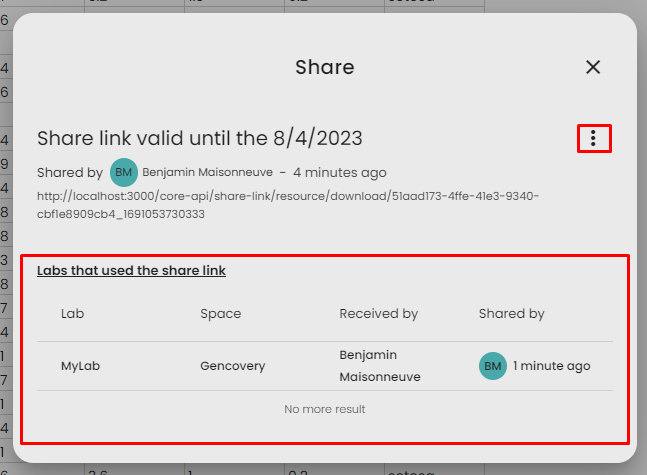
- The share object popup will appear. If there is no share link, you can create a new one. If there is a share link, it will be displayed. At the bottom of the dialog, you can access the list of data labs that used the shared link and downloaded the resource, which can be useful for traceability.
- If you don't have an existing sharing link, click on the
Create share link button to create a new share link.
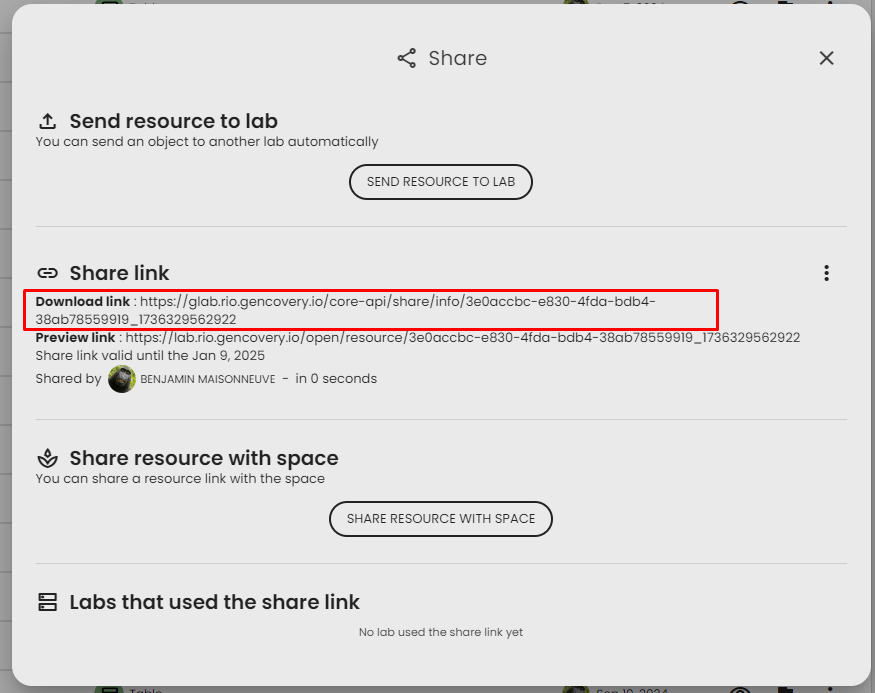
- Provide an expiration date for the link and click on save.
- The share link will be generated. You can copy the
Download link, update its validity, or delete it if needed.
To download the resource in another data lab follow these steps
- Copy the link
- Open the data lab
- Open the
Resources page, and click on Upload from link.
- Paste the link and wait for the download to finish. The resource will now be accessible in the new data lab. For more information, refer to the instructions on "How to upload a resource from an external source?".
- In the first lab you should be able to see that the resource was downloaded by the second data lab.
You can monitor all the active share links of your lab in the monitoring section. See Monitoring share links.
Send resources to another lab (e.g. a datahub)
If you frequently send resources to the same lab (e.g., a datahub), you can set up a connection between the two labs to simplify the process.
Share credentials between labs
To create a connexion between the two lab, check this : Connect two data labs
Send a resource
After setting up credentials in both labs, you can send resources:
- Open the resource details page.
- Click on menu buton
⁝ then Share button. - Click on
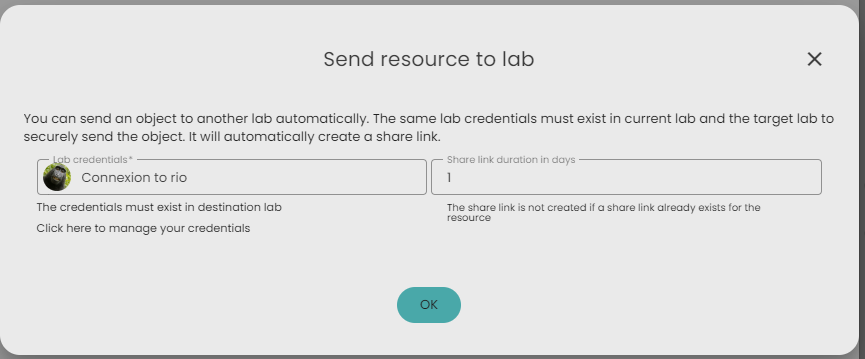
Send resource to lab. - Choose the credentials to use for the connection.
- A share link will be created automatically (you can leave it as is).
- Click on
Ok, to start the transfer. A scenario will be created in both the source and destination labs to monitor progress.
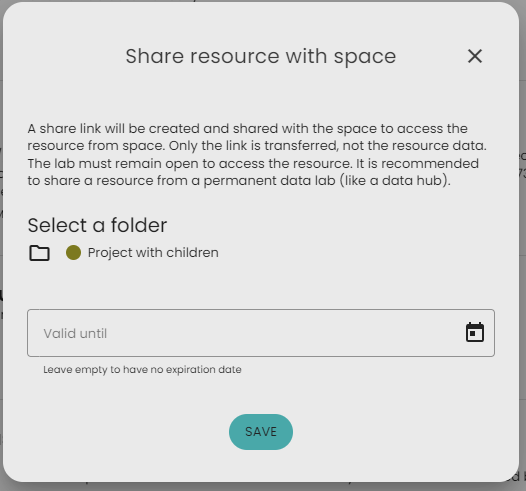
Share a resource with space folder
You can also share a resource in your space folders. The resource will be visible in the selected folder in your space, but the data will not be transferred—only a link will be shared. This means the resource will only be accessible if the lab is running. For this reason, it's recommended to share resources from a lab that is always running, such as a datahub.
Steps to share a resource in a space folder:
- Open the resource details page.
- Click on menu buton
⁝ then Share button. - Click on share resource with space.
- Choose a folder (it must be accessible from the lab; see : How to connect folder to a data lab ? ).
- Optionally, set an expiration date. Leave it empty for no expiration.
- Click on
Save .
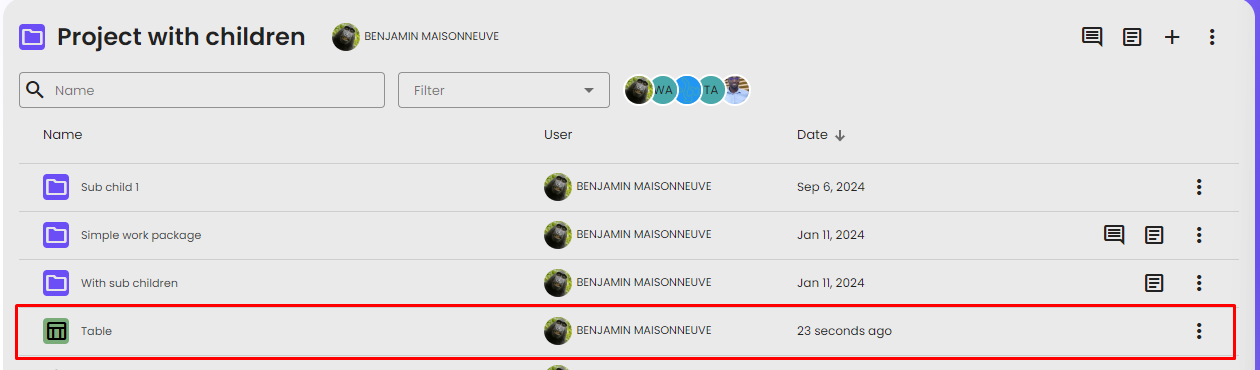
The resource is now available in your space folder, and anyone with access to the folder can view it.
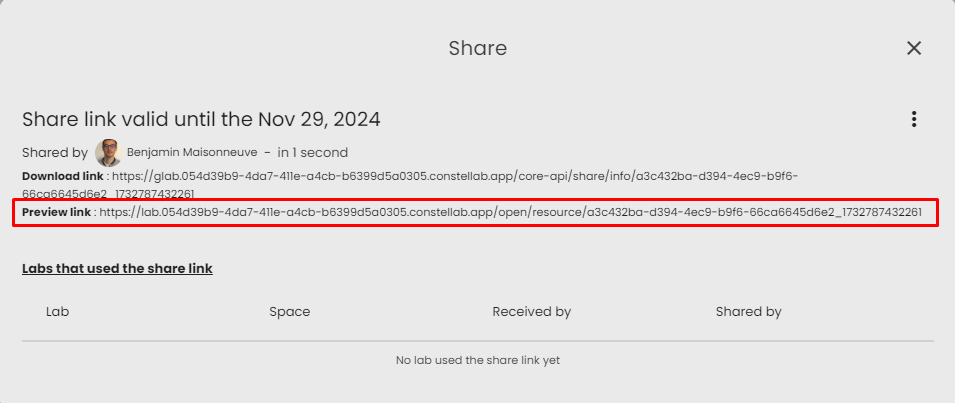
How to expose a resource with an url?
With this feature you can generate a link for a Resource. Anyone with this link will be able to access the Resource and its default view. This can be useful to give anyone access to a Resource (like a dashboard) without giving access to the data lab.
To do this, simply generate a share link as explain above. The copy the Preview link and give it to anyone you want.
How to import a resource?
When you upload a file to, it creates a resource of type File. For example, if you upload a CSV file, you may want to convert it to a resource of type Table, which is the main type of resource representing a table. A Table resource can be used in an scenario by a large variety of task. To do this, you need to import the resource. Importing a resource converts a File or Folder to a specific type. This process is important for traceability because it stores the import parameters, such as whether the header was used or the index were provided for rows.
To import a resource (not only .csv files), follow these steps:
- Go to the
Resource detail or Resources page
- Click on the menu button
⁝ of the resource.
- From the menu options, select
Import resource (if the button is not available, it means the resource is not a File).
- By default, an importer is selected based on the file extension. For example, the
Table importer is used by default for .csv, .xlsx... files. You can choose another importer if you want to import a resource of different type.
- Fill in the configuration of the importer based on your file data (check advanced config if needed).
- Click on
Import resource.
- Once finished, the imported resource should open. You can check if the import was successful. If not, you can delete the resource and restart the import with a different configuration.
- Now your resource is ready to be used in a scenario !

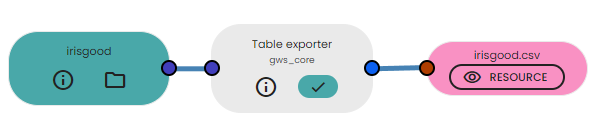
How to export a resource?
Exporting a resource is the opposite of importing. It creates a file from the resource. This can be useful when a process requires a file instead of a basic resource. For example, certain tasks, like the env live task, only accept files as input because the script runs in a virtual environment. In such cases, you may need to export the resource first.
To export a resource, follow these steps:
- Open the playground of a scenario.
- Add a process of type
exporter (you can search for them using the filter).
- Make sure there is a compatible exporter available for your resource.
- Connect your resource to this process.
- That's it! Your resource should be exported to a file on the output of the exporter.
Frequently ask questions
Why don’t I see my Space files in the Lab?
You uploaded files to a folder in your Space, then you linked that folder with your Data Lab, but the files don’t appear in the Lab. This is expected.
The Space and the Data Lab have different storage systems.
- Space is used to manage documents like reports, project files, and attachments.
- Data Lab is for storing data used in scenarios, analysis, or automation.
When you share a folder from Space with the Lab, it allows you to organize your Lab objects (like scenarios or notes) and synchronize them with the Space. But it does not transfer the files from Space to the Lab.
If you want to use data files in the Lab, upload them directly into the Data Lab: How to upload a file?
