How to manage resources?
 ▶
▶Through the Resources page, you gain access to all resources, sorted by their creation date (by default). Each resource has a name of the resource, a type (for example a type File), tags (optional), a creator and a creation date. Additionally, you will find three buttons: the first button, represented by an eye icon, opens a pop-up page displaying the resource's default view; the flag button allows you to mark a resource as important; and finally the menu button ⁝ provides access to a list of actions.
When you click on a resource, a resource page will open, displaying the resource along with a menu bar at the top and the default view. In this menu bar, you can view the name of the resource (e.g., iris.csv), which can also be modified directly by clicking on it, along with various buttons offering additional options.
The action menu
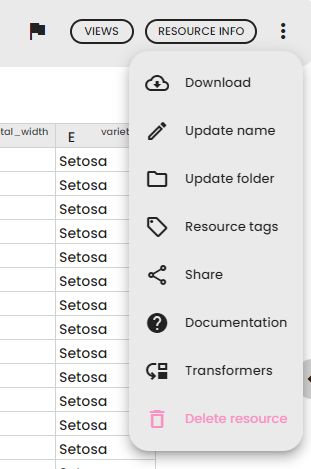
You can manage the resource using the menu button ⁝ :
- Import resource: This option is available for resources of type File or Folder. It allows you to convert the file or folder into another resource type (for example, importing a CSV file as a Table). See the section How to import a resource? for details.
- Download: This allows you to export and download the resource as a file. Note that not all resources can be downloaded.
- Update name: You can update the name of the resource.
- Update folder: If the resource was uploaded, set the folder for the resource. If the resource was generated by a scenario, this will update the folder for the entire scenario and all the generated resources.
- Tags: Use this to view and change the tags of the resource. It helps in grouping and finding resources.
- Share: Generate a share link to share a resource with another data lab, send the resource to another lab, or share it with a space folder.
- Update resource type: Change the type of the resource. This option is only available if the resource is not used in a scenario.
- Documentation: This provides information about the resource type.
- Transformers: This option lets you modify the resource directly by calling a transformer. It will trigger a background scenario automatically. This option is only available from the resource detail page.
- Delete resource: This allows you to delete a resource. If the resource was generated by a scenario, the scenario will also be deleted.
The resource detail page header
When you open a resource, the detail page displays a header bar at the top. This header shows information about the resource and provides quick access to several actions.
The header displays the resource name, which you can edit directly by clicking on it. If the resource was generated by a scenario, a clickable scenario badge appears next to the name, linking to the scenario that created it. If the resource is assigned to a folder, the folder name with its color indicator is also shown.
The header also includes the following buttons:
- Import Resource: Visible only for File or Folder resources. Opens the import dialog to convert the file into another resource type.
- Views: Opens a dropdown showing all available views for this resource.
- Resource Info: Opens a dialog with detailed information about the resource (see How to get information about a resource? below).
- Actions menu (⁝): Opens the action menu with additional options (see The action menu above).
How to get information about a resource?
To view more information about the resource, follow these steps:
- Open the
Resource detail page.
- Click on Resource Info. This opens a dialog with 4 sections:
- Resource info: Displays global information about the resource including tags, the scenario that generated it (clickable link to the scenario), folder (with color indicator), origin (Uploaded, Generated, Imported from lab, or Folder document), file information such as filename, size, and path (for File or Folder resources only), resource type (clickable link to documentation), creation date, and creator. The resource ID is also displayed — click on it to copy it to your clipboard. If the resource type is unavailable, a warning message is shown.
- History of views: Shows all views previously generated for this resource. Click on a view to display it.
- Scenarios that use the resource: Lists all scenarios that use this resource as input. Click on a scenario to open it.
- Notes that use the resource: Lists all notes that contain a view of this resource. Click on a note to open it.
What is a flagged resource?
A flagged resource is a resource that is easily available in the Resources pages. Flagged resources are marked as important and intended to be easily found.
By default, only the output resources of a scenario are flagged; intermediate resources of a scenario are not flagged. Uploaded resources are also flagged by default.
You have the flexibility to change the flag status of a resource at any time. Simply click on the flag button of the resource.
