How to import a resource?
 ▶
▶When you upload a file to your lab, it creates a resource of type File. For example, if you upload a CSV file, you may want to convert it to a resource of type Table, which is the main type of resource representing a table. A Table resource can be used in a scenario by a large variety of tasks. To do this, you need to import the resource. Importing a resource converts a File or Folder to a specific type. This process is important for traceability because it stores the import parameters, such as whether the header was used or the index were provided for rows.
To import a resource (not only .csv files), follow these steps:
- Go to the Resource detail or Resources page.
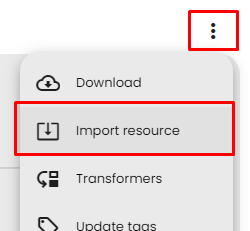
- Click on the menu button ⋮ of the resource.
- From the menu options, select Import resource (if the button is not available, it means the resource is not a
File or Folder).
- By default, an importer is selected based on the file extension. For example, the Table importer is used for .csv, .tsv, .xls, and .xlsx files, the JSON importer for .json files, the Text importer for .txt files, and the Decompress importer for .zip, .tar, and .gz files. You can choose another importer if you want to import a resource of a different type.
- Fill in the configuration of the importer based on your file data (check advanced config if needed).
- Click on Import resource.
- Once finished, the imported resource should open. You can check if the import was successful. If not, you can delete the resource and restart the import with a different configuration.
- Now your resource is ready to be used in a scenario!
How to export a resource?
 ▶
▶Exporting a resource is the opposite of importing. It creates a file from the resource. This can be useful when a process requires a file instead of a basic resource. For example, certain tasks, like the env live task, only accept files as input because the script runs in a virtual environment. In such cases, you may need to export the resource first.
To export a resource, follow these steps:
- Open the playground of a scenario.
- Add a process of type
exporter (you can search for them using the filter).
- Make sure there is a compatible exporter available for your resource.
- Connect your resource to this process.
- That's it! Your resource should be exported to a file on the output of the exporter.