How to describe a scenario ?
To describe your scenario and provide an explanation of its purpose and functionality, follow these steps:
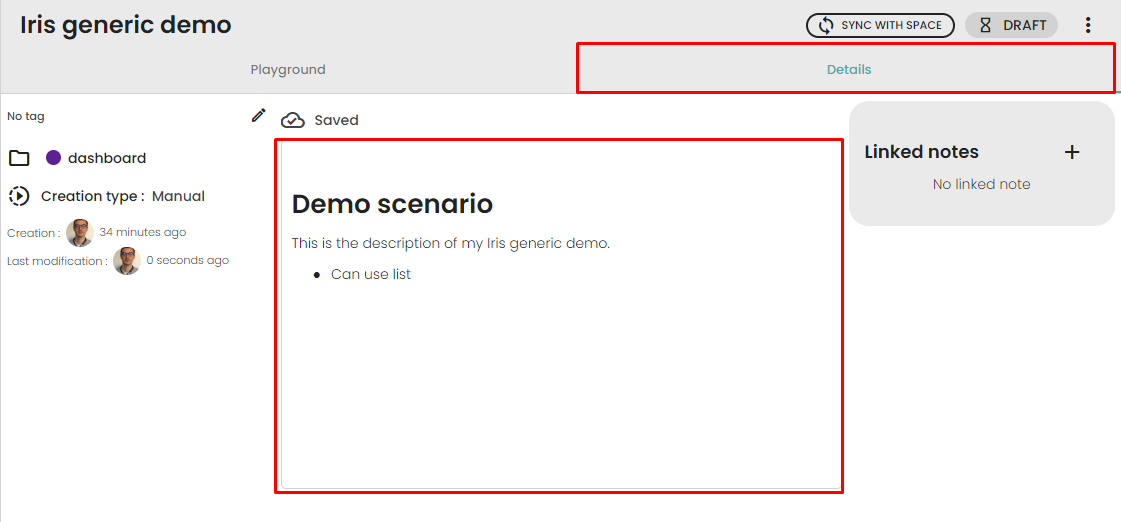
- Open the
Details section of the scenario.
- In the description field, you can provide a clear and concise description using simple styles such as bold, lists, or titles to enhance readability and organization.
How to manage a scenario ?
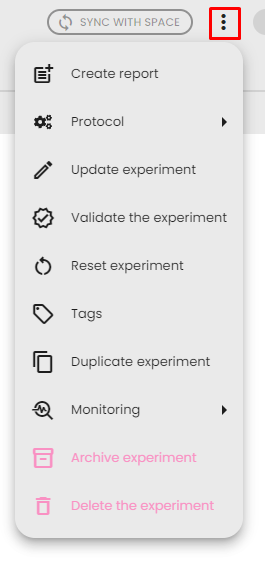
The menu button on the scenario page provides access to various information and functionalities. Here are the options available:
- Create note: This allows you to create a note associated with the scenario. With this association, you can include views from resources generated by this scenario in the note.
- Template:
- Create Scenario templates: You can create a scenario template to save the configuration of the scenario and reuse it in new scenarios. Refer to the scenario template documentation for more information.
- Download scenario Template: Download a descriptor file of the scenario template to use it elsewhere, such as in another lab or for documentation within community.
- Update scenario: Update the information about the scenario.
- Validate the scenario: Synchronize the scenario with the space and mark it as validated. Refer to the "How to Validate a scenario" documentation for more information.
- Reset scenario: Reset all the processes of the scenario and delete all generated resources. If an output resource is used in another scenario, it will ask you if you want to delete the scenario. The configuration of the processes will be retained.
- Tags: Update the tags associated with the scenario to simplify organization and categorization.
- Duplicate scenario: Create a new draft scenario with the same configuration as the current scenario. This option allows you to quickly create similar scenarios based on an existing one.
- Monitoring: Access messages, logs, and monitoring features at the scenario level. This allows you to track and monitor the progress and status of the scenario.
- Archive scenario: Mark the scenario and generated resources as archives. Archived scenarios will be hidden by default in the scenarios page (and resource hidden in resources pages), providing a way to declutter and organize your workspace.
- Delete scenario: Delete the scenario and its generated resources. Before deleting the scenario, it will be reset (cf. Reset scenario section) Note that this option is not available if the scenario is validated.
How to link notes to a scenario?
The Details tab of a scenario includes a Linked notes section on the right side. This allows you to associate existing notes with your scenario, making it easy to reference related documentation alongside your analysis.
To link a note to a scenario:
- Open the Details tab of your scenario.
- In the Linked notes section on the right, click the + button.
- A dialog appears where you can select an existing note from your lab.
- Select the note you want to link. It will appear in the linked notes list.
To unlink a note, click the unlink button next to the note in the linked notes list and confirm the action.
How to synchronize a scenario with space ?
The synchronization allows you to synchronize a scenario and its configuration with your space. After synchronization, the folder team can access the scenario and its technical information even if they do not have access to the data lab. The synchronization with the folder space allows the team members to track the progress of the data analysis and, more importantly, ensures the reproducibility of the analysis. However, the synchronization of an scenario does not synchronize the associated resources, only the configuration.
To synchronize a scenario with your space, follow these steps:
- Open the scenario you want to synchronize.
- Check if the scenario is attached to a project. If not, please refer to Manage the scenario to associate it with a folder. The scenario must be associated to a folder before synchronisation to be properly located in your space. You must have access to the folder in the space to be able to sync the scenario.
- Once the scenario is associated with a folder, click on the
Sync with space button. If the button is disabled, it means that the scenario is not associated to a folder.
- After synchronization, the scenario and its configuration will be available in your space. Anyone with access to the folder will be able to see the synchronized scenario.

How to validate a scenario ?
The validation process involves permanently freezing a scenario and its associated results. Validation takes place when the analysis is complete and the scenario meets your expectations—usually when you're prepared to document the final results. This process ensures that the scenario's state and configurations are finalized, preventing further modifications. To ensure reproducibility, traceability, and to prevent unintended changes, the validation process is NOT reversible. Throughout validation, the scenario will automatically synchronize with your space (see How to synchronize a scenario ?). This requirement implies that your scenario must be associated with a folder to undergo validation.
To validate the scenario, follow theses steps :
- Make sure the folder is associated with a folder. If it is not associated with a folder, please refer to the instructions on Manage the scenario to associate it with a folder.
- Ensure that the scenario is in its desired and final state, as validation is not reversible.
- Click on the menu button of the scenario then
Validate scenario button
- The scenario will be marked as validated, and it will be locked from further modifications.
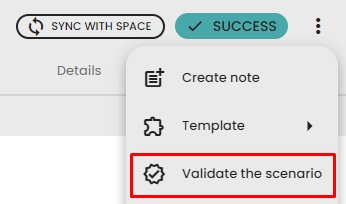
After the validation, your scenario will be stored and accessible in your space.
How to share scenarios between data labs?
Share from a share link
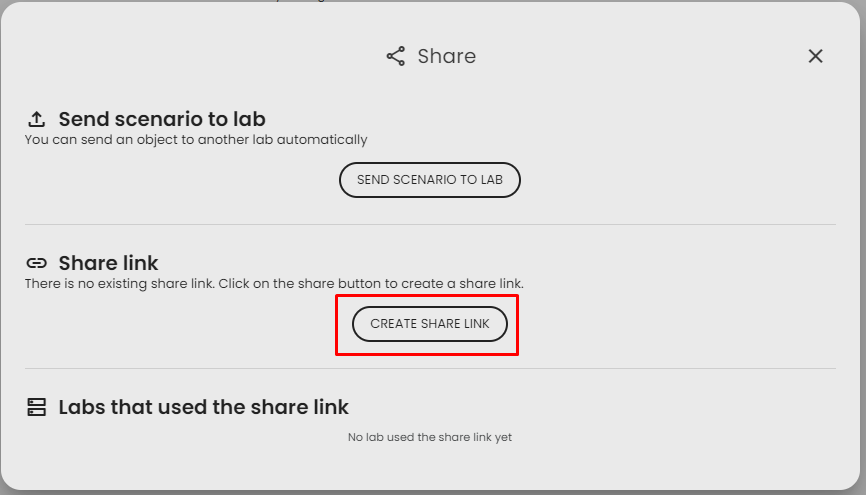
Sharing scenarios between data labs is easy, it allows one data lab to download a scenario generated by another data lab. To do so, follow these steps:
- Open the
Scenario detail page.
- Click on menu buton
⁝ then Share button.
- The share object popup will appear. If there is no share link, you can create a new one. If there is a share link, it will be displayed. At the bottom of the dialog, you can access the list of data labs that used the shared link and downloaded the scenario, which can be useful for traceability.
- If you don't have an existing sharing link, click on the
Create share link button to create a new share link.
- Provide an expiration date for the link and click on save.
- The share link will be generated. You can copy the
Download link, update its validity, or delete it if needed.
To download the scenario in a different data lab follow these steps
- Copy the link.
- Open the data lab.
- Open the
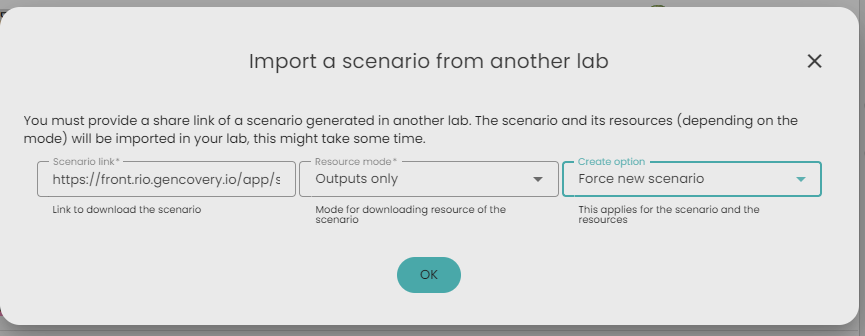
Scenarios page, and click on Import a scenario from another lab.
- Paste the link and choose your options:
- Resource mode: Decide which resources to download.
- Create option:
- Skip if exists : Skips the download if the scenario already exists. It also reuse existing resources.
- Force new scenario : Creates a new scenario and resources even if they already exist.
- Click on Ok to start the transfer. A scenario will be created in the data lab to monitor progress.
Send a scenario to another lab (e.g. a datahub)
If you frequently send scenarios to the same lab (e.g., a datahub), you can set up a connection between the two labs to simplify the process.
Share credentials between labs
To create a connexion between the two lab, check this : Connect two data labs
Send a scenario
After setting up credentials in both labs, you can send scenarios:
- Open the scenario details page.
- Click on menu buton
⁝ then Share button. - Click on
Send scenario to lab. - Choose the credentials to use for the connection.
- A share link will be created automatically (you can leave it as is).
- Click on
Ok, to start the transfer. A scenario will be created in both the source and destination labs to monitor progress.
