Streamlit is a popular Python package for rapidly building data apps. You can find more information and examples on the Streamlit website: https://streamlit.io/. With this you can integrate interactive applications in Constellab that aggregate informations of your scenario, across multiple scenarios or generate scenarios and notes.
When you're deploying a Streamlit app in Constellab, the system takes care of deployment, security, and app cleanup, so you don't need to worry about those aspects.
Streamlit Agent
The Streamlit agent is a special type of task that lets you create a Streamlit application connected to your lab's data.
The inputs of the agent will be automatically added to the StreamlitApp and will be ready to use in the streamlit code. In the agent you have access to special variables:
- sources Variables: Contains a list of input resources, functioning similarly to a Python agent.
- params Variable: Contains a dictionary of provided parameters, functioning similarly to a Python agent.
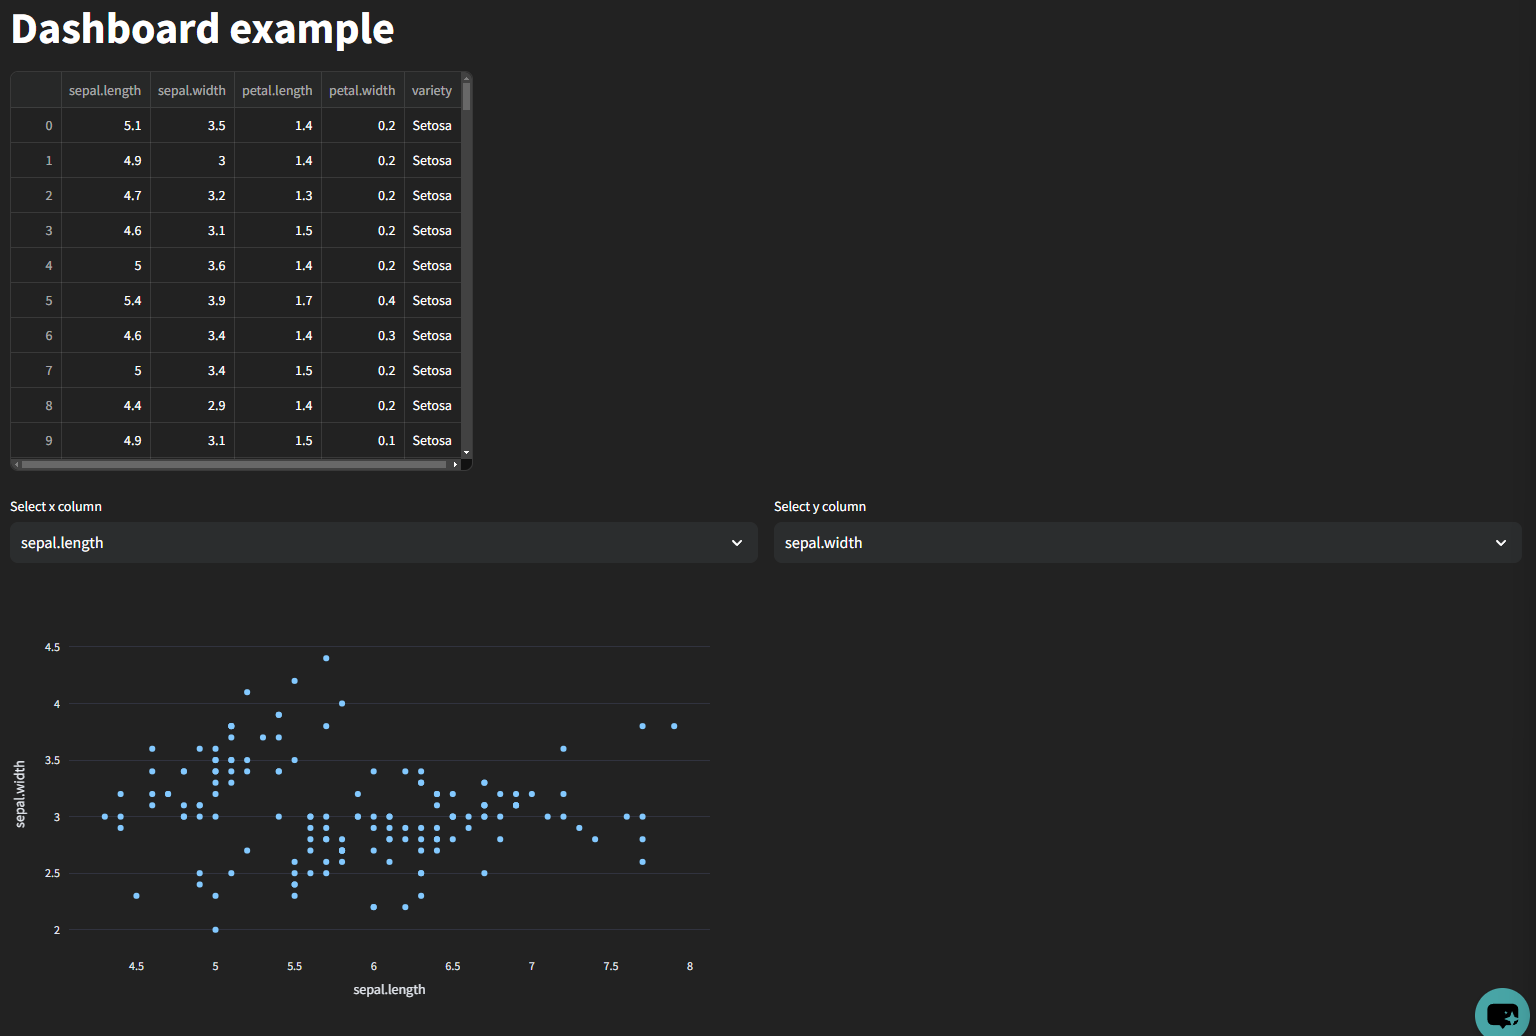
Here is an example of a simple Streamlit agent that takes a table as input and a title as parameter. It generates an app enabling users to create a scatter plot by selecting two columns from the dataframe.
# This is a template for a streamlit agent.
# This generates an app with one dataframe as input. Then the user can select 2 columns to plot a scatter plot.

import plotly.express as px
import streamlit as st
from pandas import DataFrame

# Your Streamlit app code here
st.title(params.get('title'))

# show a table from file_path which is a csv file full width
if sources:
    df: DataFrame = sources[0].get_data()

    # show the dataframe
    st.dataframe(df)

    # add a select widget with the columns names with no default value
    # set the selectbox side by side
    col1, col2 = st.columns(2)

    with col1:
        x_col = st.selectbox("Select x column", options=df.columns, index=0)

    with col2:
        y_col = st.selectbox("Select y column", options=df.columns, index=1)

    if x_col and y_col:
        # Generate a scatter plot with plotly express
        fig = px.scatter(df, x=x_col, y=y_col)
        st.plotly_chart(fig)
Here is the result app :
Virtual env agent
You can create a StreamlitApp using a virtual env streamlit agent. These agents work like virtual environment agents and support Conda, Mamba, and Pip for managing environments.
The virtual env streamlit agents only accept files and folders as input and need an environment file. In your code, you can use the source_paths variable, which is a list of paths for the input files and folders.
App task
To see how to develop an app in a task within your brick check: Develop a task app in your brick.
Inputs
The inputs resources will be available under the sources variable (with the same order as added) in the streamlit code.
Config
The parameters will be available as a dict under the params variable in the streamlit code.
Import another file
The app folder is loaded as a python module so you can import any other file from this package. Example to load the file _dashboard_code/plot/plot_generator.py from the _dashboard_code/main.py file use: import _dashboard_code.plot.plot_generator
Example of a streamlit app task
Here is an example of a streamlit app using a folder and multiple files.
First we create the structure for our StreamlitApp and our task using the CLI.
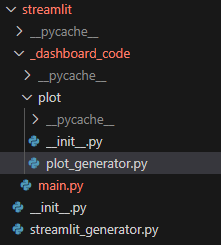
The folder _dashboard_code contains the streamlit code. The streamlit_generator.py file contains the task that will create the application. The _dashboard_code folder maintains the main.py file (entrypoint for the app). It also contains a sub module plot imported by main.py to work with multiple file. The _dashboard_code folder a a common python module structure.
Here is the content of the main.py file.
# This is a template for a streamlit agent.
# This generates an app with one dataframe as input. Then the user can select 2 columns to plot a scatter plot.

from typing import List

import streamlit as st
from gws_core import Resource
from pandas import DataFrame
from _dashboard_code.plot.plot_generator import generate_scatter_plot

# thoses variable will be set by the streamlit app
# don't initialize them, there are create to avoid errors in the IDE
sources: List[Resource]
params: dict

# Your Streamlit app code here
st.title(params.get('title'))

# show a table from file_path which is a csv file full width
if sources:
    df: DataFrame = sources[0].get_data()

    # show the dataframe
    st.dataframe(df)

    # add a select widget with the columns names with no default value
    # set the selectbox side by side
    col1, col2 = st.columns(2)

    with col1:
        x_col = st.selectbox("Select x column", options=df.columns, index=0)

    with col2:
        y_col = st.selectbox("Select y column", options=df.columns, index=1)

    generate_scatter_plot(df, x_col, y_col)
And the content of plot_generator sub file.
import plotly.express as px
import streamlit as st
from pandas import DataFrame


def generate_scatter_plot(dataframe: DataFrame, x_col: str, y_col: str) -> None:
    if x_col and y_col:
        # Generate a scatter plot with plotly express
        fig = px.scatter(dataframe, x=x_col, y=y_col)
        st.plotly_chart(fig)
Then we create a task that will generates the StreamlitApp. It takes a table as input and a title as config.
import os

from gws_core import (ConfigParams, ConfigSpecs, InputSpec, InputSpecs,
                      OutputSpec, OutputSpecs, StreamlitResource, StrParam,
                      Table, Task, TaskInputs, TaskOutputs, task_decorator,
                      app_decorator, AppConfig, AppType)

@app_decorator("GenerateApp", app_type=AppType.STREAMLIT)
class GenerateApp(AppConfig):

    # retrieve the path of the app folder, relative to this file
    # the app code folder starts with a underscore to avoid being loaded when the brick is loaded
    def get_app_folder_path(self):
        return self.get_app_folder_from_relative_path(
            __file__,
            "_dashboard_code"
        )


@task_decorator("StreamlitGenerator", human_name="Generate app for table",
                short_description="Task to generate a custom Streamlit app from a table")
class StreamlitGenerator(Task):

    input_specs: InputSpecs = InputSpecs({'table': InputSpec(Table, human_name="Table")})
    output_specs: OutputSpecs = OutputSpecs({
        'streamlit_app': OutputSpec(StreamlitResource, human_name="Streamlit app")
    })
    config_specs: ConfigSpecs = {
        'title': StrParam(human_name='App title')
    }

    def run(self, params: ConfigParams, inputs: TaskInputs) -> TaskOutputs:

        # build the streamlit resource with the code and the resources
        streamlit_resource = StreamlitResource()

        # set the input in the streamlit resource
        table: Table = inputs.get('table')
        streamlit_resource.add_resource(table)

        # set the param of the streamlit resource
        title = params.get_value('title')
        streamlit_resource.set_param('title', title)

        # set app reference
        streamlit_resource.set_app_config(GenerateApp())

        return {'streamlit_app': streamlit_resource}
That's it 🎉, the streamlit app is ready to be used. You can find the complete code of this in the academy brick.
Custom components
In gws_core we developed few custom component for streamlit app. They can be imported from gws_core.streamlit package. Check the streamlit showcase for view the components in action with code example: Streamlit showcase.
You can find the code of those component here.
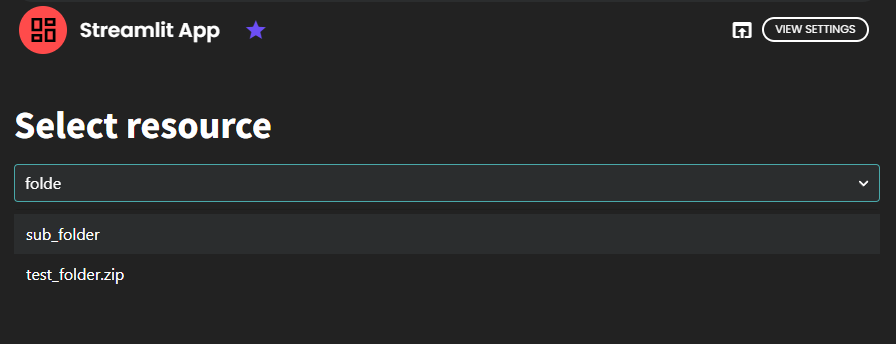
Select resource
The ResourceSearchInput class allows you to show a resource selector in your streamlit application. It allows user to search resource by name and you can prefilter the result (only showing resource of a type for example).
from gws_core.streamlit import ResourceSearchInput

selected_resource: ResourceModel | None = ResourceSearchInput() \
    # only show the flagged resources
    .add_flagged_filter(True) \
    # only show not archived resource
    .add_is_archived_filter(False) \
    # order by name
    .add_order_by(ResourceModel.name) \
    # call select
    .select(placeholder="Search for folder")

if selected_resource:
    st.write(selected_resource.name)
Rich text
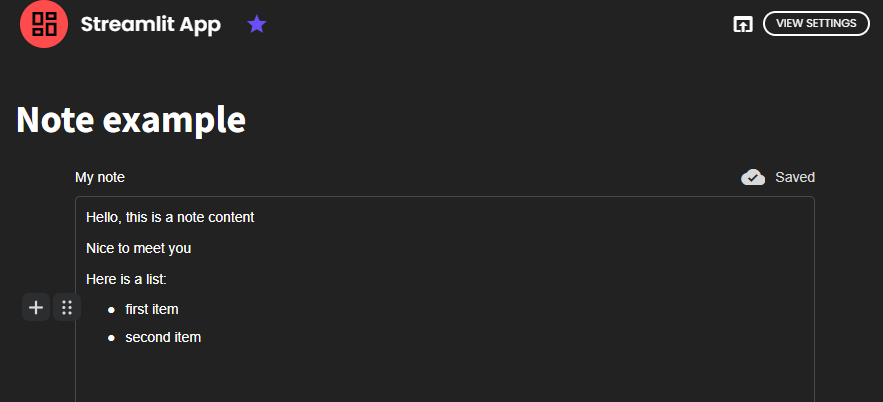
The rich_text_editor method allows you to include the rich text editor (similar to note) in your application.
from gws_core.streamlit import rich_text_editor
from json import dump, load

folder = sources[0]
file_path = os.path.join(folder.path, 'test.json')

# initialising the rich text from a json file
rich_text: RichText = None
if os.path.exists(file_path):
    # load json file to rich text
    with open(file_path, 'r') as f:
        rich_text = RichText.from_json(load(f))
else:
    rich_text = RichText()

# calling component
result = rich_text_editor(placeholder='My note', initial_value=rich_text,
                          key="note")

if result:
    # saving modified rich text to json file
    with open(file_path, 'w') as f:
        dump(result.to_dto_json_dict(), f)
Dataframe paginator
Streamlit doesn't have a way of paginate big dataframe natively. You can use the dataframe_paginated method from gws_core.streamlit. It support row and column pagination.
Here is an example on how to use it:
from gws_core.streamlit import dataframe_paginated
from pandas import DataFrame

my_df : DataFrame = sources[0]

dataframe_paginated(my_df, paginate_rows=True, row_page_size_options=[50,100 ,250],
                   paginate_columns=False, column_page_size_options=None)
Troubleshoot
Connecting / Connection lost / Connection timed out
If you encounter connection issues such as "Connecting/Connection lost/Connection timed out" when opening the Streamlit app, please close the resource or view and then reopen it. This should resolve the issue and allow you to use the app again.
Port 8501 already is use
When developing a streamlit app, if you encounter error 'Port 8501 already is use', this means that you have another streamlit app that is already running. Streamlit app can be running :
- in a terminal of the codelab, in this case, kill the terminal
- in the lab in dev mode. In Monitoring > Other > Streamlit app you can check if there is an app running and stop it. You can also kill the dev environment.
If you can't find the running streamlit app, another solution might be to restart the lab from the lab manager section.
